Importing a Custom Robot
While OmniGibson assets includes a set of commonly-used robots, users might still want to import robot model of their own. This tutorial introduces users
Preparation
In order to import a custom robot, You will need to first prepare your robot model file. For the next section we will assume you have the URDF file for the robots ready with all the corresponding meshes and textures. If your robot file is in another format (e.g. MJCF), please convert it to URDF format. If you already have the robot model USD file, feel free to skip the next section and move onto Author the Robot Definition.
Data-driven robots (no Python subclass needed)
Since the Isaac Sim 5.1 migration, a robot is defined entirely by data — an imported USD plus a single RobotDefinition YAML at <gm.DATA_PATH>/<dataset>/models/<name>/<name>.yaml, which OmniGibson auto-discovers at startup. The old "write stretch.py and edit robots/__init__.py" workflow is obsolete; see Author the Robot Definition.
Below, we will walk through each step for importing a new custom robot into OmniGibson. We use Hello Robotic's Stretch robot as an example, taken directly from their official repo.
Convert from URDF to USD
There are two ways to convert our raw robot URDF into an OmniGibson-compatible USD file. The first is by using our integrated script, while the other method is using IsaacSim's native URDF-to-USD converter via the GUI. We highly recommend our script version, as it both wraps the same functionality from the underlying IsaacSim converter as well as providing useful features such as automatic convex decomposition of collision meshes, programmatic adding of sensors, etc.
Option 1: Using Our 1-Liner Script (Recommended)
Our custom robot importer import_custom_robot.py wraps the native URDF Importer from Isaac Sim to convert our robot URDF model into USD format. Please see the following steps for running this script:
- All that is required is a single source config yaml file that dictates how the URDF should be post-processed when being converted into a USD. You can run
import_custom_robot.py --helpto see a detailed example configuration used, which is also shown below (r1_pro_source_config.yaml) for your convenience. - By default, output files are written to
<gm.DATA_PATH>/omnigibson-robot-assets/objects/robot/<name>/. The destination dataset is configurable via the optionaldataset_namekey in the source config (defaultomnigibson-robot-assets). The imported asset is not yet discoverable at this location — it must be copied into themodels/tree and paired with aRobotDefinitionYAML. See Register the Robot.
Some notes about the importing script:
-
The importing procedure can be summarized as follows:
-
Copy the raw URDF file + any dependencies into the output dataset directory (
<gm.DATA_PATH>/<dataset>/objects/robot/<name>/, where<dataset>defaults toomnigibson-robot-assets) - Updates the URDF + meshes to ensure all scaling is positive
- Generates collision meshes for each robot link (as specified by the source config)
- Generates metadata necessary for OmniGibson
- Converts the post-processed URDF into USD (technically, USDA) format
- Generates relevant semantic metadata for the given object, given its category
- Generates visual spheres, cameras, and lidars (in that order, as specified by the source config)
- Updates wheel approximations (as specified by the source config)
- Generates holonomic base joints (as specified by the source config)
-
Generates configuration files needed for CuRobo motion planning (as specified by the source config)
-
If
merge_fixed_joints=true, all robot links that are connected to a parent link via a fixed joint will be merged directly into the parent joint. This means that the USD will not contain these links! However, this collapsing occurs during the final URDF to USD conversion, meaning that these links can be referenced beforehand (e.g.: when specifying desired per-link collision decomposition behavior) - CuRobo is a highly performant motion planner that is used in OmniGibson for specific use-cases, such as skills. However, CuRobo requires a manually-specified sphere representation of the robot to be defined. These values can be generated using IsaacSim's interactive GUI, and should be exported and copied into the robot source config yaml file used for importing into OmniGibson. You can see the set of values used for the R1 robot below. For more information regarding specific keys specified, please see CuRobo's Configuring a New Robot tutorial.
r1_pro_source_config.yaml
1 2 3 4 5 6 7 8 9 10 11 12 13 14 15 16 17 18 19 20 21 22 23 24 25 26 27 28 29 30 31 32 33 34 35 36 37 38 39 40 41 42 43 44 45 46 47 48 49 50 51 52 53 54 55 56 57 58 59 60 61 62 63 64 65 66 67 68 69 70 71 72 73 74 75 76 77 78 79 80 81 82 83 84 85 86 87 88 89 90 91 92 93 94 95 96 97 98 99 100 101 102 103 104 105 106 107 108 109 110 111 112 113 114 115 116 117 118 119 120 121 122 123 124 125 126 127 128 129 130 131 132 133 134 135 136 137 138 139 140 141 142 143 144 145 146 147 148 149 150 151 152 153 154 155 156 157 158 159 160 161 162 163 164 165 166 167 168 169 170 171 172 173 174 175 176 177 178 179 180 181 182 183 184 185 186 187 188 189 190 191 192 193 194 195 196 197 198 199 200 201 202 203 204 205 206 207 208 209 210 211 212 213 214 215 216 217 218 219 220 221 222 223 224 225 226 227 228 229 230 231 232 233 234 235 236 237 238 239 240 241 242 243 244 245 246 247 248 249 250 251 252 253 254 255 256 257 258 259 260 261 262 263 264 265 266 267 268 269 270 271 272 273 274 275 276 277 278 279 280 281 282 283 284 285 286 287 288 289 290 291 292 293 294 295 296 297 298 299 300 | |
Preprocessing a messy URDF
Vendor URDFs (especially CAD exports) often contain artifacts that break the importer. The helper module omnigibson/utils/urdf_preprocessing.py operates on a parsed xml.etree.ElementTree, so you can clean a URDF before importing it. Start by auditing:
from omnigibson.utils.urdf_preprocessing import urdf_audit
print(urdf_audit("my_robot.urdf"))
# -> n_links / n_joints / joint_type_counts / mimic_joints / mesh_refs / mesh_formats /
#    package_uris / nonascii_paths / broken_relative_paths / links_without_inertial / root_link
Each cleaner helper mutates the tree in place and returns the number of changes it made. The one exception is sanitize_names, which returns its {old: new} rename map.
| Helper | Fixes | When you need it |
|---|---|---|
rewrite_mesh_paths(tree, [(old, new), ...]) |
Rewrites <mesh filename> substrings |
Converting package:// URIs or broken relative paths (../../) into absolute paths |
stage_meshes(tree, dest_dir) |
Copies every mesh into a clean dir under a USD-safe basename (space/paren -> _), dedupes shared sources |
Mesh filenames contain spaces/parens — the importer names each geometry prim after the mesh basename, so a space yields an ill-formed SdfPath and the whole import fails. Run after rewrite_mesh_paths (needs resolvable paths) |
sanitize_names(tree) |
Replaces space/paren in link & joint names (and all parent/child/mimic refs) | The importer silently renames such links, breaking downstream name matching. Returns the rename map so you can update your config/definition references identically |
strip_mimic_joints(tree) |
Removes all <mimic> elements |
The importer writes no DriveAPI on a mimic joint, leaving the mimicking finger non-drivable. Let the runtime gripper controller drive both fingers instead |
override_joint_limits(tree, {joint: {attr: val}}) |
Sets <limit> attributes |
Joints shipped with all-zero <limit effort="0" ... velocity="0"/> (common for grippers/wheels) are non-drivable in sim |
set_joint_dynamics(tree, joints, **attrs) |
Sets <dynamics> (e.g. friction=0) |
Sluggish/jerky drive from CAD friction values |
link_has_dedicated_collision(link_el) |
Reports whether a link already has a real collision proxy | Used internally by the importer's auto-detect (see Collision handling) |
A typical end-to-end pass (the recipe used for Gento Luna — package:// URIs, spaces/parens in mesh and link/joint names, mimic joints, zeroed limits):
import xml.etree.ElementTree as ET
from omnigibson.utils.urdf_preprocessing import (
    rewrite_mesh_paths, stage_meshes, strip_mimic_joints, sanitize_names,
    override_joint_limits, urdf_audit,
)

tree = ET.parse("vendor/robot.urdf")
rewrite_mesh_paths(tree, [("package://robot_description/", "/abs/robot_description/")])  # -> absolute
stage_meshes(tree, "staging/meshes_clean")            # -> space-free mesh basenames
strip_mimic_joints(tree)                              # -> drivable fingers
renames = sanitize_names(tree)                        # -> space-free link/joint names (keep the map!)
override_joint_limits(tree, {                         # -> repair zeroed limits
    renames.get("left finger_joint", "left finger_joint"): {"effort": 30, "velocity": 0.1, "lower": 0, "upper": 0.05},
})
tree.write("staging/robot.urdf", encoding="utf-8", xml_declaration=True)
assert urdf_audit("staging/robot.urdf")["package_uris"] == 0  # confirm it is now clean
Point your source config's urdf_path at the cleaned URDF. If sanitize_names renamed anything, use the sanitized names everywhere downstream (source config and definition YAML) — they are the values in the returned renames map.
Option 2: Using IsaacSim's Native URDF-to-USD Converter
In this section, we will be using the URDF Importer in native Isaac Sim to convert our robot URDF model into USD format. Before we get started, it is strongly recommended that you read through the official URDF Importer Tutorial.
-
Create a directory with the name of the new robot under
<PATH_TO_OG_ASSET_DIR>/models. This is where all of our robot models live. In our case, we created a directory namedstretch. -
Put your URDF file under this directory. Additional asset files such as STL, obj, mtl, and texture files should be placed under a
meshesdirectory (see ourstretchdirectory as an example). -
Launch Isaac Sim from the Omniverse Launcher. In an empty stage, open the URDF Importer via
Isaac Utils->Workflows->URDF Importer. -
In the
Import Options, uncheckFix Base Link(we will have a parameter for this in OmniGibson). We also recommend that you check theSelf Collisionflag. You can leave the rest unchanged. -
In the
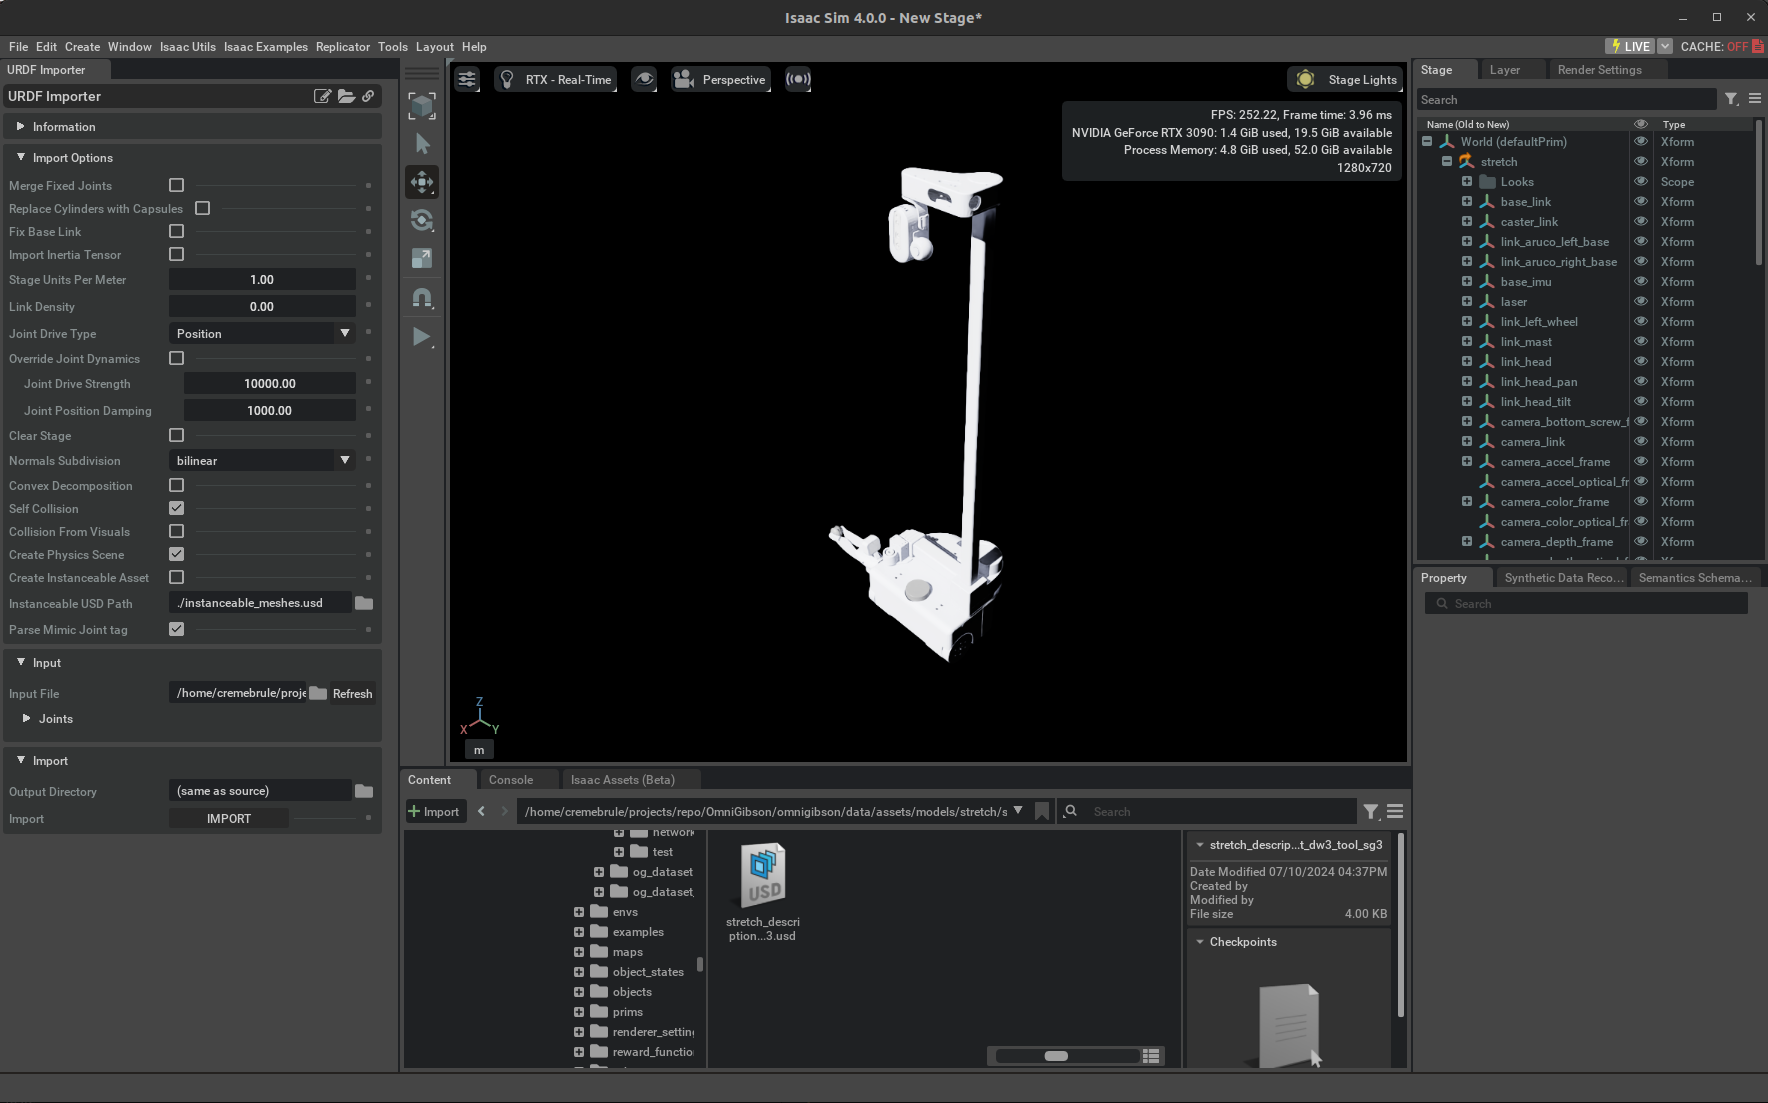
Importsection, choose the URDF file that you moved in Step 1. You can leave the Output Directory as it is (same as source). Press import to finish the conversion. If all goes well, you should see the imported robot model in the current stage. In our case, the Stretch robot model looks like the following:
Process USD Model
Now that we have the USD model, let's open it up in Isaac Sim and inspect it.
-
In IsaacSim, begin by first Opening a New Stage. Then, Open the newly imported robot model USD file.
-
Make sure the default prim or root link of the robot has
Articulation RootpropertySelect the default prim in
Stagepanel on the top right, go to thePropertysection at the bottom right, scroll down to thePhysicssection, you should see theArticulation Rootsection. Make sure theArticulation Enabledis checked. If you don't see the section, scroll to top of thePropertysection, andAdd->Physics->Articulation Root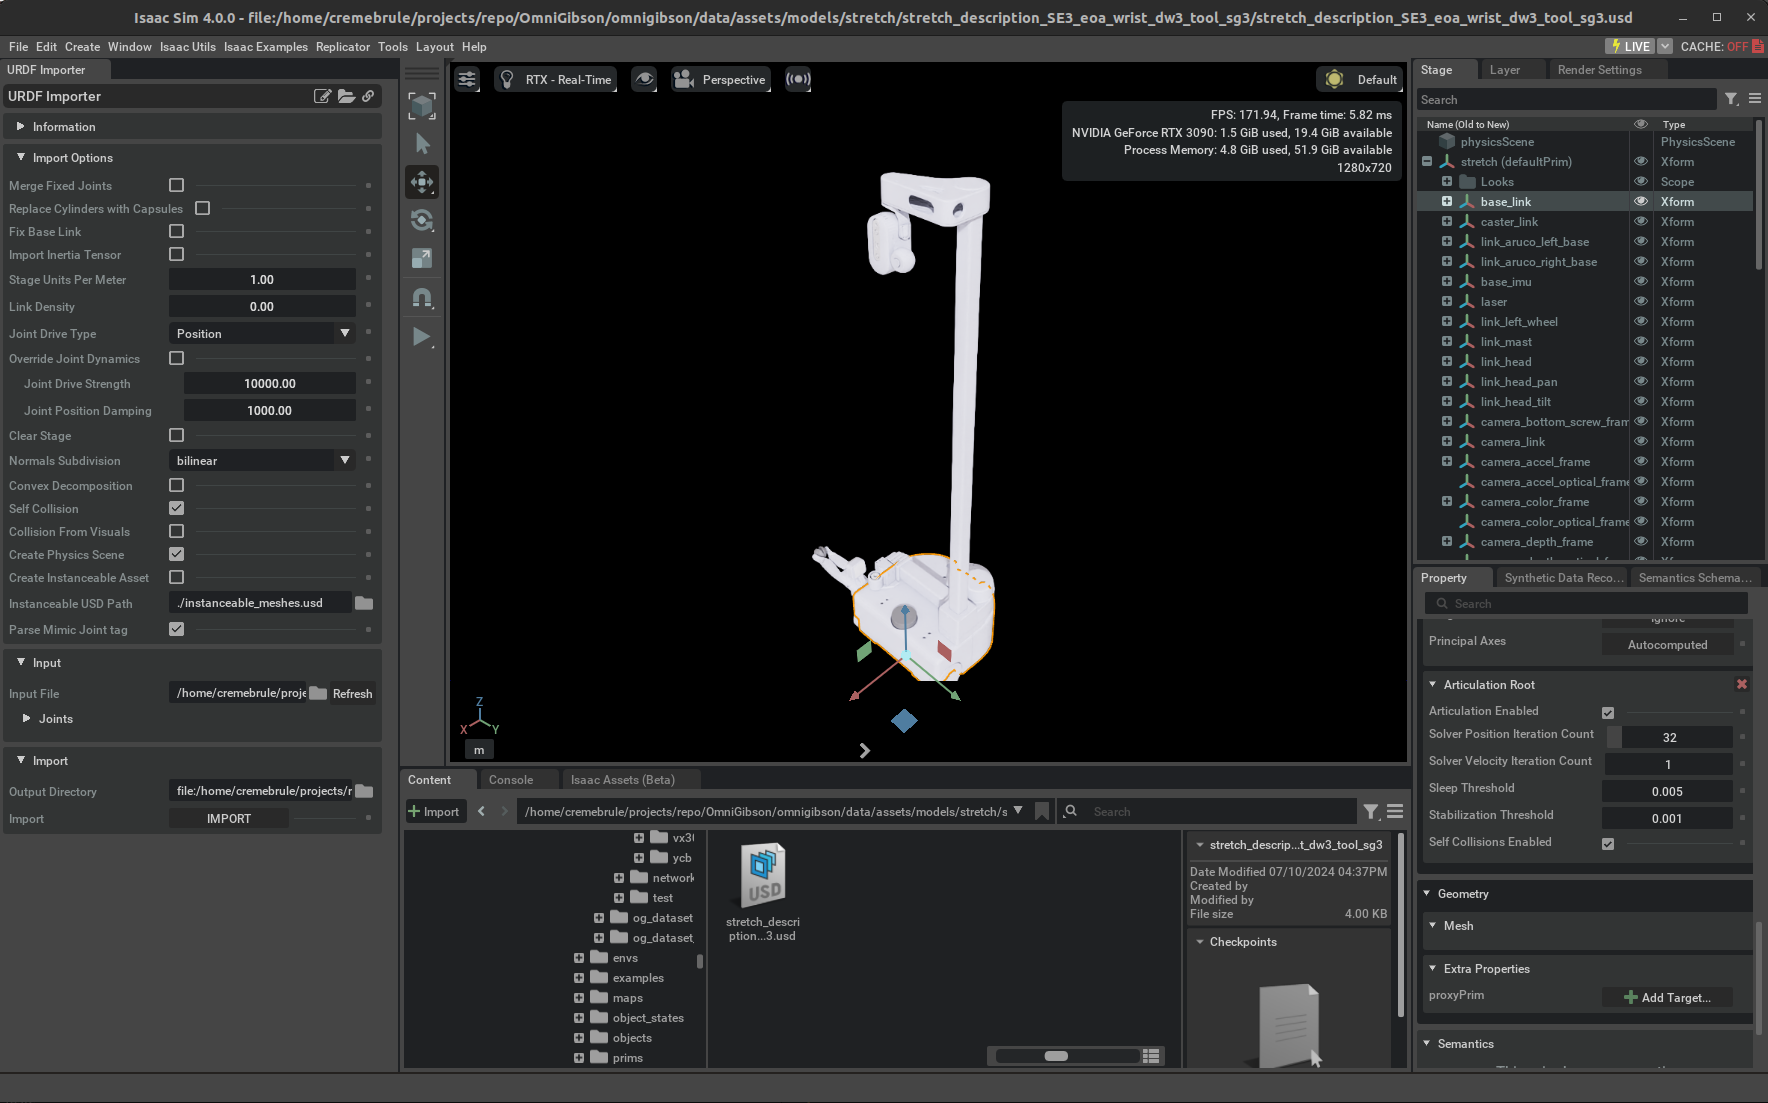
-
Make sure every link has visual mesh and collision mesh in the correct shape. You can visually inspect this by clicking on every link in the
Stagepanel and view the highlighted visual mesh in orange. To visualize all collision meshes, click on the Eye Icon at the top and selectShow By Type->Physics->Colliders->All. This will outline all the collision meshes in green. If any collision meshes do not look as expected, please inspect the original collision mesh referenced in the URDF. Note that IsaacSim cannot import a pre-convex-decomposed collision mesh, and so such a collision mesh must be manually split and explicitly defined as individual sub-meshes in the URDF before importing. In our case, the Stretch robot model already comes with rough cubic approximations of its meshes.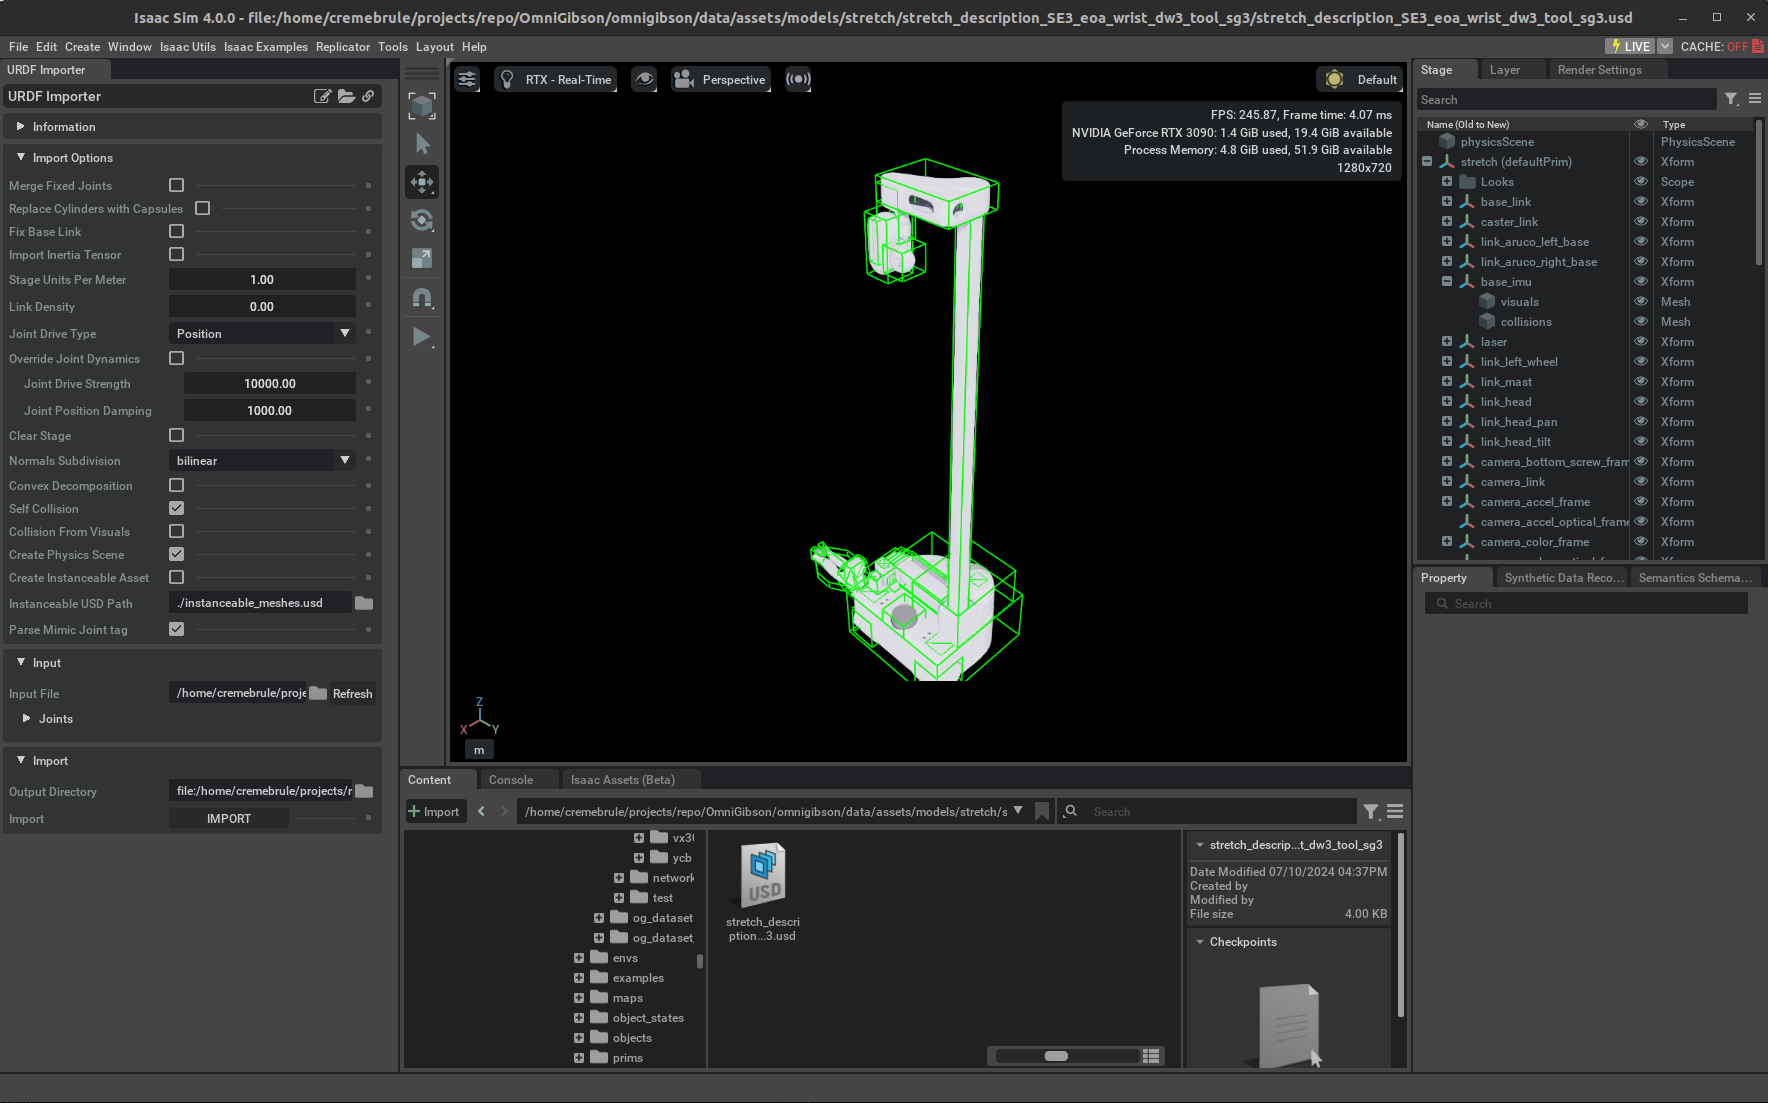
-
Make sure the physics is stable:
-
Create a fixed joint in the base: select the base link of the robot, then right click ->
Create->Physics->Joint->Fixed Joint -
Click on the play button on the left toolbar, you should see the robot either standing still or falling down due to gravity, but there should be no abrupt movements.
-
If you observe the robot moving strangely, this suggests that there is something wrong with the robot physics. Some common issues we've observed are:
-
Self-collision is enabled, but the collision meshes are badly modeled and there are collision between robot links.
-
Some joints have bad damping/stiffness, max effort, friction, etc.
-
One or more of the robot links have off-the-scale mass values.
-
At this point, there is unfortunately no better way then to manually go through each of the individual links and joints in the Stage and examine / tune the parameters to determine which aspect of the model is causing physics problems. If you experience significant difficulties, please post on our Discord channel.
-
-
The robot additionally needs to be equipped with sensors, such as cameras and / or LIDARs. To add a sensor to the robot, select the link under which the sensor should be attached, and select the appropriate sensor:
- LIDAR: From the top taskbar, select
Create->Isaac->Sensors->PhysX Lidar->Rotating - Camera: From the top taskbar, select
Create->Camera
You can rename the generated sensors as needed. Note that it may be necessary to rotate / offset the sensors so that the pose is unobstructed and the orientation is correct. This can be achieved by modifying the
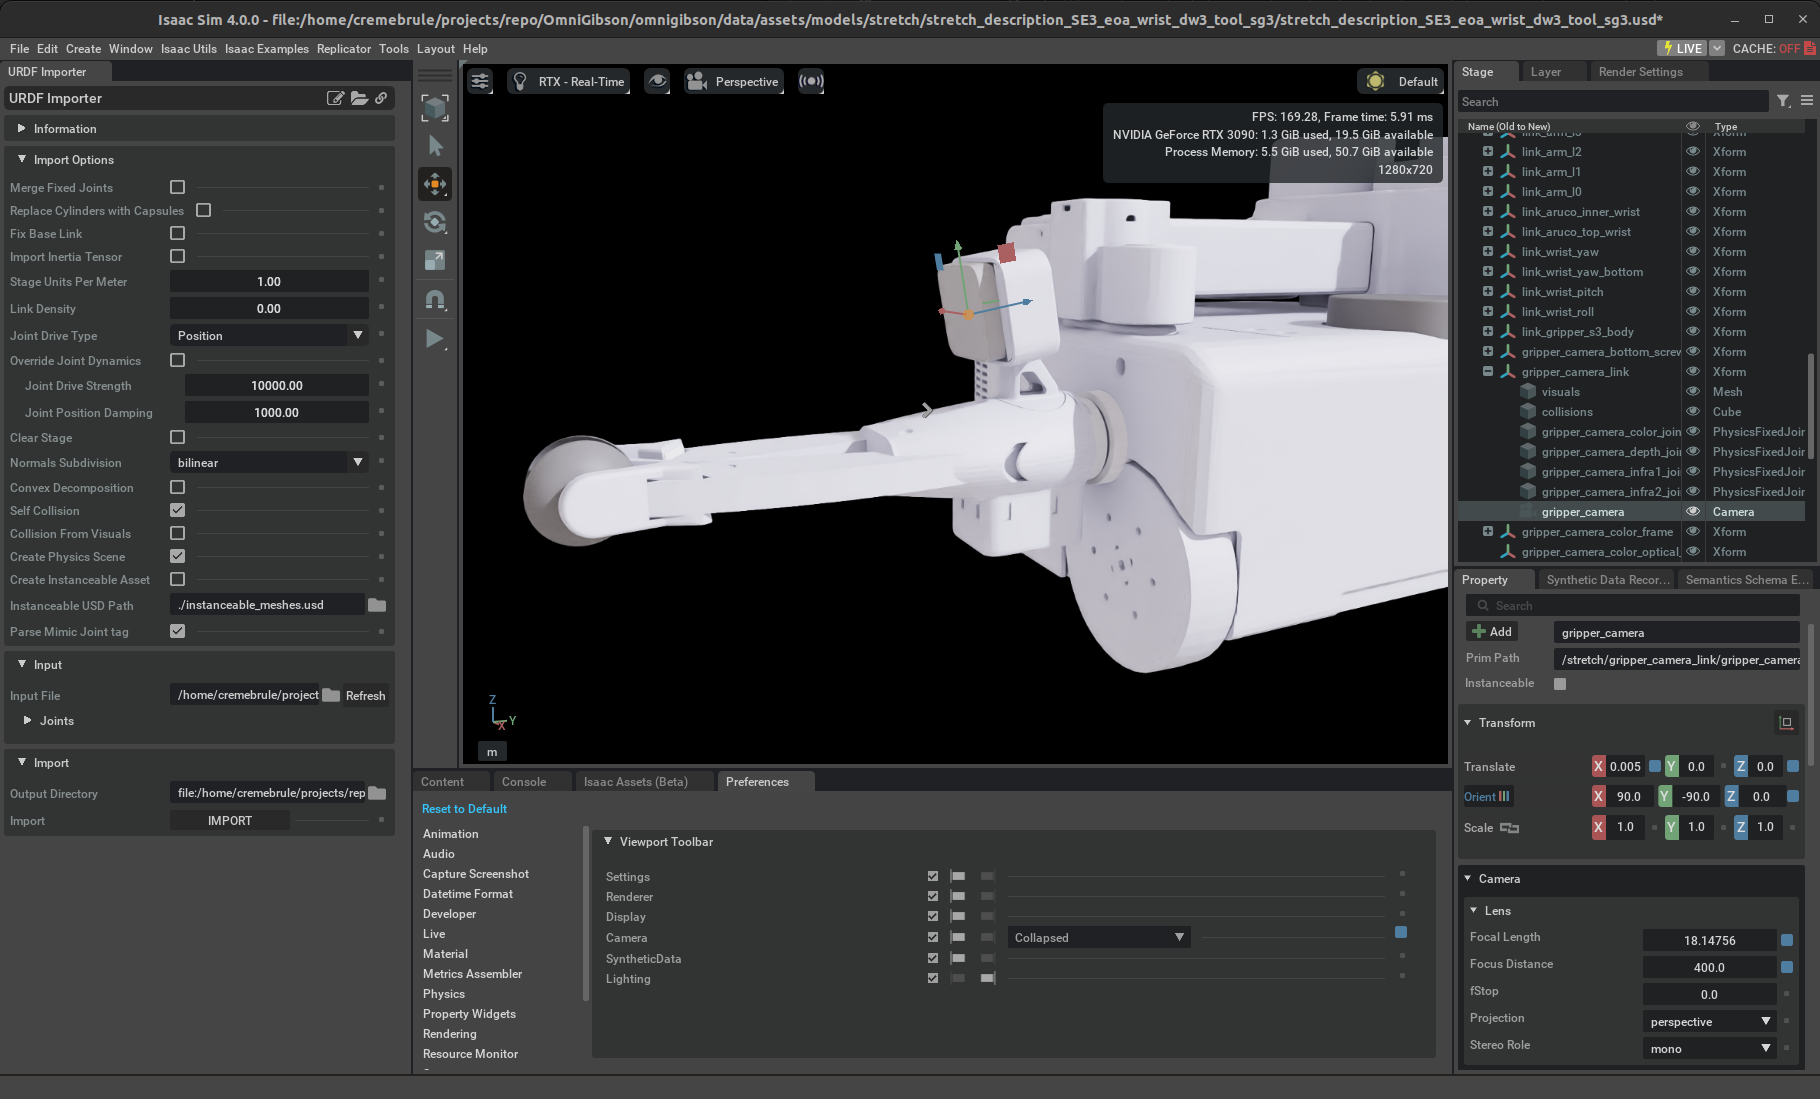
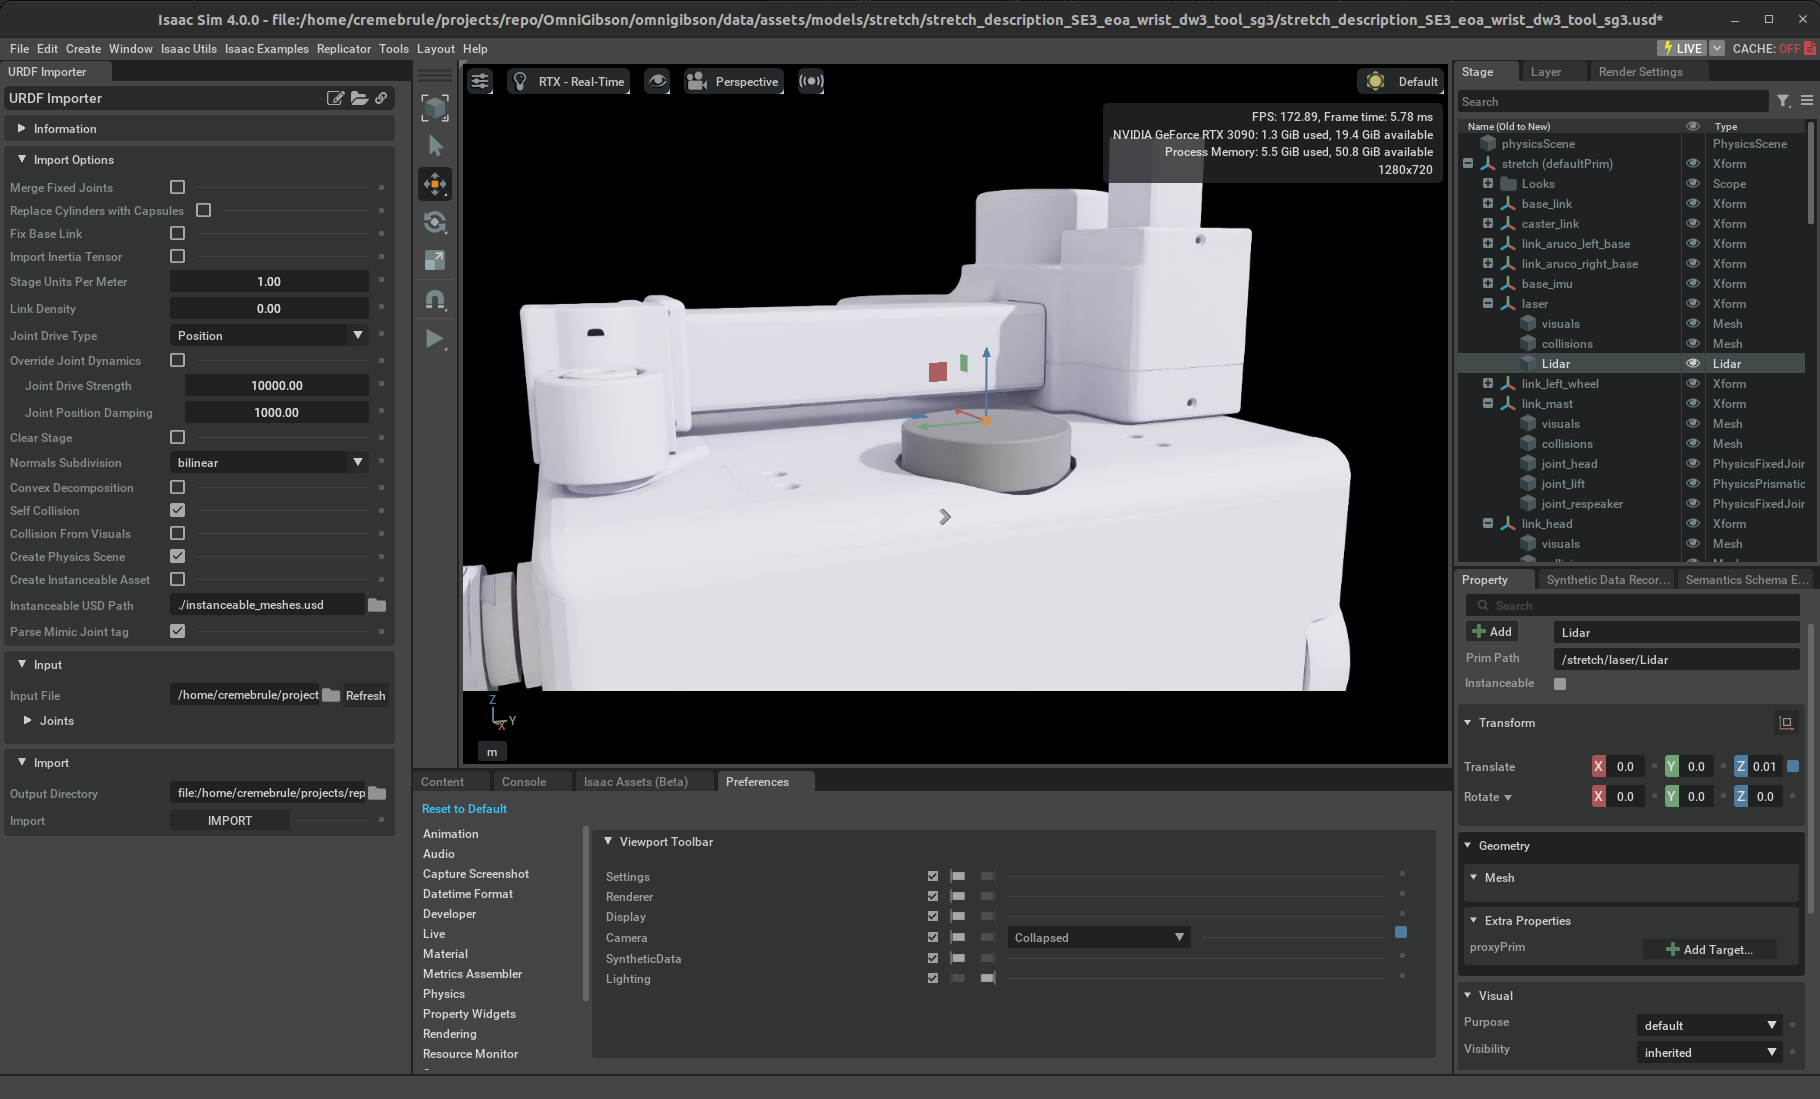
TranslateandRotateproperties in theLidarsensor, or theTranslateandOrientproperties in theCamerasensor. Note that the local camera convention is z-backwards, y-up. Additional default values can be specified in each sensor's respective properties, such asClipping RangeandFocal Lengthin theCamerasensor.In our case, we created a LIDAR at the
laserlink (offset by 0.01m in the z direction), and cameras at thecamera_linklink (offset by 0.005m in the x direction and -90 degrees about the y-axis) andgripper_camera_linklink (offset by 0.01m in the x direction and 90 / -90 degrees about the x-axis / y-axis).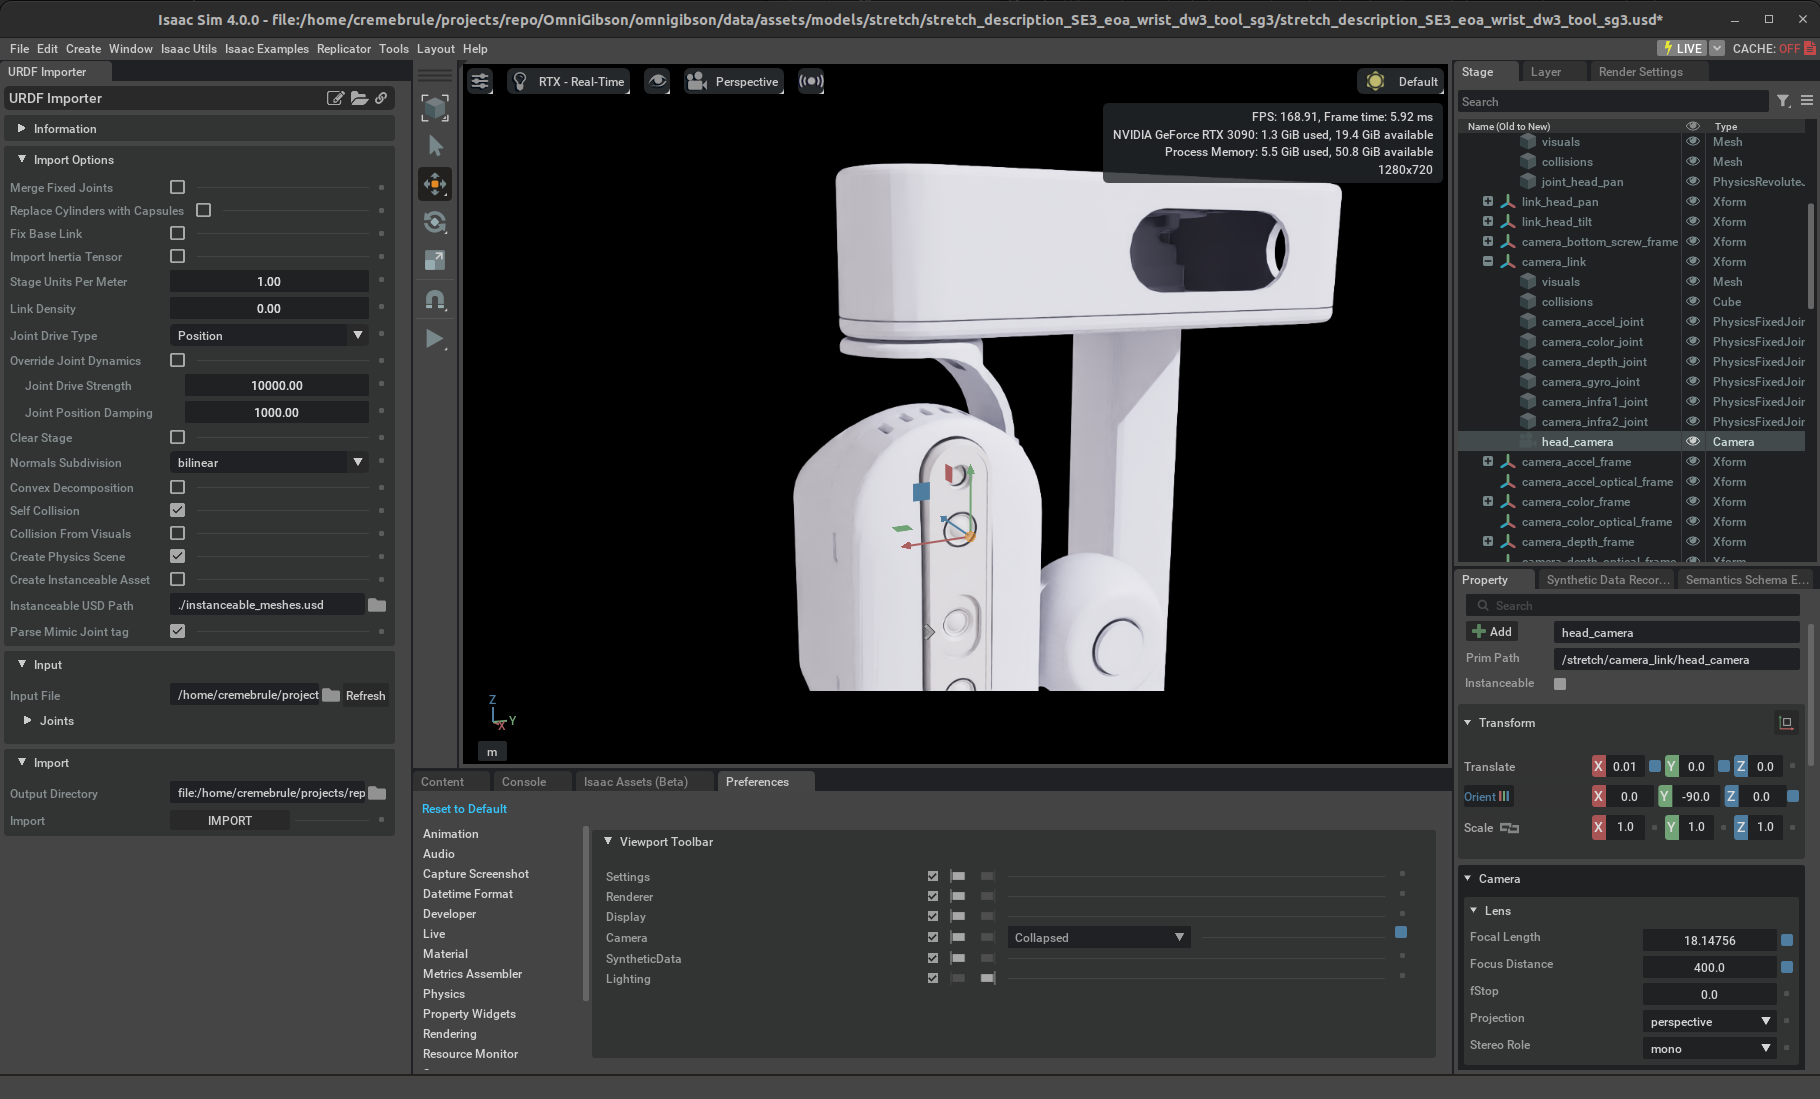
- LIDAR: From the top taskbar, select
-
Finally, save your USD (as a USDA file)! Note that you need to remove the fixed link created at step 4 before saving. Please save the file to
<gm.DATA_PATH>/omnigibson-robot-assets/models/<name>/usd/<name>.usda.
Register the Robot
The import script writes the converted asset to <gm.DATA_PATH>/<dataset>/objects/robot/<name>/, but OmniGibson discovers robots under the models/ tree. Two steps make the robot loadable:
-
Copy the imported asset from
objects/robot/<name>/intomodels/<name>/. Use the bundled helper (idempotent): -
Author a
RobotDefinitionYAML (next section) and place it at<gm.DATA_PATH>/<dataset>/models/<name>/<name>.yaml. At startup,REGISTERED_ROBOTSglobs<gm.DATA_PATH>/*/models/*/*.yaml, so a correctly-placed definition is auto-registered under its file stem — no Python class and norobots/__init__.pyedits required. A single concreteRobotclass is instantiated for every robot; capabilities are composed from whichever definition sub-config blocks are present (not from inheritance). You can then load the robot viamodel: <name>(lowercase) in any environment/robot config.
Author the Robot Definition
A robot is described by a single RobotDefinition YAML (schema in definition_schema.py). Only raw_controller_order and default_controllers are required; each capability is opted into by adding its sub-config block. OmniGibson infers the robot's interfaces from which blocks are present — replacing the old multiple-inheritance class.
| Sub-config block | Enables | Key fields |
|---|---|---|
manipulation |
Arm(s) + gripper(s) | n_arms, arm_names, arm_{link,joint}_names, eef_link_names, finger_{link,joint}_names, arm_workspace_range |
holonomic_base |
Holonomic (x, y, rz) base | force_sphere_wheel_approximation |
two_wheel |
Differential-drive base | wheel_radius, wheel_axle_length |
locomotion |
Base joints / floor contact | base_joint_names, floor_touching_base_link_names |
articulated_trunk |
Controllable torso | trunk_joint_names, trunk_link_names |
active_camera |
Controllable head/camera | camera_joint_names |
mobile_manipulation |
Tuck/untuck arm poses | untucked_default_joint_pos, tucked_default_joint_pos |
Top-level fields worth calling out:
default_joint_pos— rest pose (one value per DOF). Required if any arm uses anInverseKinematicsController(it supplies the IK null-space reset pose); a missing value crashes at load. Zeros are a valid starting point to refine later.self_collisions(true/false/unset) — overrides the robot's default self-collision setting at load. Auto-generated hulls often overlap at rest, so NVIDIA's guidance isfalse(relying on planner spheres /disabled_collision_pairs). Leave unset to keep the default.disabled_collision_pairs/disabled_collision_link_names— filter specific colliding pairs, or disable all collision on named links. Prefer these withself_collisions: trueto keep self-collision on for the rest of the robot.base_footprint_link_name— root link a synthesized holonomic base attaches to.
Below is the in-repo R1 definition — a complete, working dual-arm holonomic-base example:
r1.yaml (RobotDefinition)
If your robot is a manipulation robot, it additionally needs a CuRobo description YAML (for end-effector motion planning) under models/<name>/curobo/. When you import with import_custom_robot.py, these are generated automatically from the curobo block in your source config (shown in the R1 source config above) — you do not write them by hand. The generated file looks like:
r1_description_curobo_default.yaml
1 2 3 4 5 6 7 8 9 10 11 12 13 14 15 16 17 18 19 20 21 22 23 24 25 26 27 28 29 30 31 32 33 34 35 36 37 38 39 40 41 42 43 44 45 46 47 48 49 50 51 52 53 54 55 56 57 58 59 60 61 62 63 64 65 66 67 68 69 70 71 72 73 74 75 76 77 78 79 80 81 82 83 84 85 86 87 88 89 90 91 92 93 94 95 96 97 98 99 100 101 102 103 104 105 106 107 108 109 110 111 112 113 114 115 116 117 118 119 120 121 122 123 124 125 126 127 128 129 130 131 132 133 134 135 136 137 138 139 140 141 142 143 144 145 146 147 148 149 150 151 152 153 154 155 156 157 158 159 160 161 162 163 164 165 166 167 168 169 170 171 172 173 174 175 176 177 178 179 180 181 182 183 184 185 186 187 188 189 190 191 192 193 194 195 196 197 198 199 200 201 202 203 204 205 206 207 208 209 210 211 212 213 214 215 216 217 218 219 220 221 222 223 224 225 226 227 228 229 230 231 232 233 234 235 236 237 238 239 240 241 242 243 244 245 246 247 248 249 250 251 252 253 254 255 256 257 258 259 260 261 262 263 264 265 266 267 268 269 270 271 272 273 274 275 276 277 278 279 280 281 282 283 284 285 286 287 288 289 290 291 292 293 294 295 296 297 298 299 300 301 302 303 304 305 306 307 308 309 310 311 312 313 314 315 316 317 318 319 320 321 322 323 324 325 326 327 328 329 330 331 332 333 334 335 336 337 338 339 340 341 342 343 344 345 346 347 348 349 350 351 352 353 354 355 356 357 358 359 360 361 362 363 364 365 366 367 368 369 370 371 372 373 374 375 376 377 378 379 380 381 382 383 384 385 386 387 388 389 390 391 392 393 394 395 396 397 398 399 400 401 402 403 404 405 406 407 408 409 410 411 412 413 414 415 416 417 418 419 420 421 422 423 424 425 426 427 428 429 430 431 432 433 434 435 436 437 438 439 440 441 442 443 444 445 446 447 448 449 450 451 452 453 454 455 456 457 458 459 460 461 462 463 464 465 466 467 468 469 470 471 472 473 474 475 476 477 478 479 480 481 482 483 484 485 486 487 488 489 490 491 492 493 494 495 496 497 498 499 500 501 502 503 504 505 506 507 508 509 510 511 512 513 514 515 516 517 518 519 520 521 522 523 524 525 526 527 528 529 530 531 532 533 534 535 536 537 538 539 540 541 542 543 544 545 546 547 548 549 550 551 552 553 554 555 556 557 558 559 560 561 562 563 564 565 566 567 568 569 570 571 572 573 574 575 576 577 578 579 580 581 582 583 584 585 586 587 588 589 590 591 592 593 594 595 596 597 598 599 600 601 602 603 604 605 606 607 608 609 610 611 612 613 614 615 616 617 618 619 620 621 622 623 624 625 626 627 628 629 630 631 632 633 634 635 636 | |
Collision handling
The importer auto-detects existing collision proxies (link_has_dedicated_collision): a link whose <collision> is a primitive or a mesh different from its visual mesh is preserved; a link is only regenerated when its collision is missing or identical to the visual mesh (regenerating a hull from a dense visual mesh balloons it and causes self-collision instability). The collision.{coacd_links, convex_links, no_decompose_links, no_collision_links} lists are overrides on top of this:
- Ships good collision meshes -> leave the lists empty (preserved automatically).
- Ships none -> pick
convex(fast, one hull/link; good withself_collisions: false) orcoacd(slower, multi-hull;pip install coacd). A single convex base hull +use_sphere_wheelskeeps a mobile base flat. - Put sensor/decoration frames (cameras, IMUs, F/T sensors) in
no_collision_links.
Some additional notes:
- Spaces/parens/non-ASCII in names or mesh filenames are the most common hard failure: the importer renames offending links/joints and names each geometry prim after the mesh basename, so a space yields an ill-formed USD path and the import fails (surfacing as a
null primerror). Runstage_meshesandsanitize_names, then re-urdf_audituntilpackage_uris/broken_relative_paths/mimic_joints/nonascii_pathsare0. - Isaac Sim 5.1 no longer merges fixed-joint links that carry mass/inertia (4.x did). These leftover sub-parts can self-collide at rest — disable them individually via
disabled_collision_link_names, unless the link needs collision (e.g. gripper fingertips). - IK arms require
default_joint_pos, or load crashes. - CAD exports often ship bad inertials / off-scale masses / zeroed limits — audit and repair (
override_joint_limits,set_joint_dynamics) first.
Deploy Your Robot!
You can now test your custom robot by launching the control example:
Try different controller options and teleop the robot with your keyboard. If you observe poor joint behavior, inspect and tune the relevant joint parameters as needed — this also exposes bugs that may have crept in along the way (missing/bad joint limits, collisions, etc.). Please refer to the Franka or Fetch robots as a baseline for joint parameters that work well.
Validation gates
A quick programmatic check helps: load into Rs_int, step a few dozen frames with a zero action and assert the robot settles (max joint velocity -> ~0) without drifting, then nudge each controller's action slice and assert its joints respond. Note get_joint_positions()/get_joint_velocities() return torch tensors — .detach().cpu().numpy() before NumPy ops.
This is what our newly imported Stretch robot looks like in action: